GoPro cameras are everywhere these days. People mount them onto bikes, cars, drones, you name it. There’s a whole lot of equipment that facilitates their convenience, and yes, that includes snorkeling.
There’s a whole lot of gear to consider. Besides that, the number of tips are almost endless. Wondering where to start? Considering to buy a GoPro? Interested in all the features? Curious about the coolest accessories?
The GoPro Camera At A Glance
At the time of writing this article, the new GoPro Hero 8 has just been released (October 2019). The GoPro Hero 7 was already a big improvement after it’s release in September 2018. We’ll compare some of the differences in a second.
Ever since the Hero 4 series, more and more GoPro camera’s are waterproof by default. In the older days, taking a GoPro when snorkeling required you to get a so called “housing”. In case you recently bought one, or if you’re planning to get one, it should most likely be waterproof with all doors closed.
Tip: If you don’t know if your GoPro is waterproof, simply head on over to their website and find out. Or, instead, follow this link that will take you to their list directly.
The latest versions are waterproof up to 33 feet underwater. If you plan to go deeper, there’s a so called “Super Suit” which allows for dives up to 196 feet. We’ll go into more detail later on, when we talk about all the possible gear to consider.
GoPro Hero 6, 7 And 8
If you don’t have a GoPro yet, and you want to buy one, I’d say consider one of the latest versions. Just like any other gadgets, it’s important to compare the quality and the price.
How Deep Can You Go?
These three camera’s allow you to snorkel up to 33 feet, which should be more than enough for snorkeling. I don’t think I ever made it that far down without scuba gear.
Video Quality
Since capturing videos is what most people use it for, try to aim for high video quality. The Hero 6 Black, the Hero 7 Black and the Hero 8 Black are all able to capture in 4K resolution at 60 frames per second, which is commonly used for digital televisions to give you an idea.
SuperPhoto Intelligence
When taking still pictures, they all shoot with a 12 megapixel resolution. However, there has been a slight improvement in picture quality: The Hero 7 Black and 8 Black are both equipped with a so called “SuperPhoto” intelligence. This means the camera has the ability to automatically analyze the scenery for optimal picture quality.
How About Audio?
Is it important for you to record the best possible audio along with your video? In a nutshell, there is a big difference between these three models. The 7 Black has better audio quality than the 6 Black, but the 8 Black is definitely the best. You can really hear the difference.
Stabilisation
If stabilization is important for you, the 8 Black is by far the best. Both the 6 and the 7 come with a stabilization mode, however, you’ll still have quite a shaky video if you don’t hold the camera still. The 8 Black comes with a so called “HyperSmooth 2.0” functionality, which is absolutely amazing. In my opinion, this is the biggest improvement thus far. It’s really awesome!
How Expensive Are They?
The new Hero 8 Black sells for $349.00 at Amazon. It’s the cheapest we found online (here’s the link if you’re interested to check it out). The cheapest Hero 7 Black we could find is $298.95 (here’s the link). The best offer we could find for the 6 Black is $219.90, which you can check out here. Make sure to also consider a used camera, they’re often just as good as new.
So, which one should you choose?
If you plan to only use your GoPro for snorkeling, maybe the audio function isn’t that relevant, and you could consider the 6 Black as it’s the cheapest. If you’re not doing this professionally, and you don’t expect a perfect stabilization, go for the 6 or 7. “SuperPhoto” on the 7 and 8 is fun, sure, but how important is taking the perfect picture for you? If it’s not your main priority, why not stick with the 6 Black?
Therefore, in my opinion, the Hero 6 Black is more than enough for most “hobby” snorkelers. If you prefer to shoot extremely stable videos, go for the Hero 8 Black. It all depends on your budget as well.
Some Of The Best GoPro Accessories For Snorkeling
There are different ways to enhance your snorkel GoPro adventure. New gear keeps coming up, and to be honest, your choices are almost endless. However, there are a few gadgets that can really make the difference. And that’s what we dive into right now.
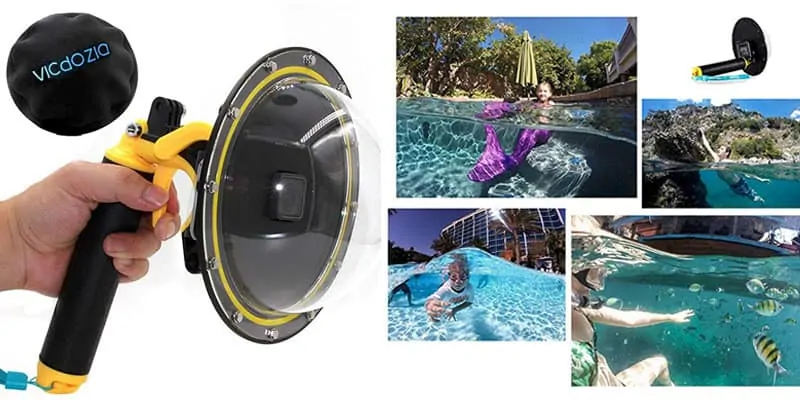
Dome Port
A dome port enables you to take clear photos that are half above and half below the water level. The dome actually moves the water line away from the camera, which helps to make the shot even clearer. They’re usually around 50 bucks, like the one we show you here. To check current prices, here’s the link to Amazon.
Extendable GoPole
The extendable GoPole is just like a selfie stick for the GoPro. This snorkel GoPro mount allows you to get a closer shot of the marine life, take selfies, or video yourself from a distance. The maximum extension is 40 inches. It comes with a smart remote clip and it’s compatible with all GoPro Hero cameras. You usually pay around 20 bucks, but feel free to check it’s latest price here.

GoPro Snorkel Mask
There are two types of snorkel masks that allow you to fit your GoPro right on top. You can either go for a full face mask or a “regular” snorkel mask. I personally use both, depending on the situation, but most of the time I go with a regular mask. The picture below shows the one that I use, but there are a lot of different versions available. Don’t pay attention to the Hero 4 in the picture, this mask is compatible with every GoPro Hero camera!
Tip: Read our full face snorkel mask guide in case that’s the mask you use. We cover their camera attachment in that article separately.

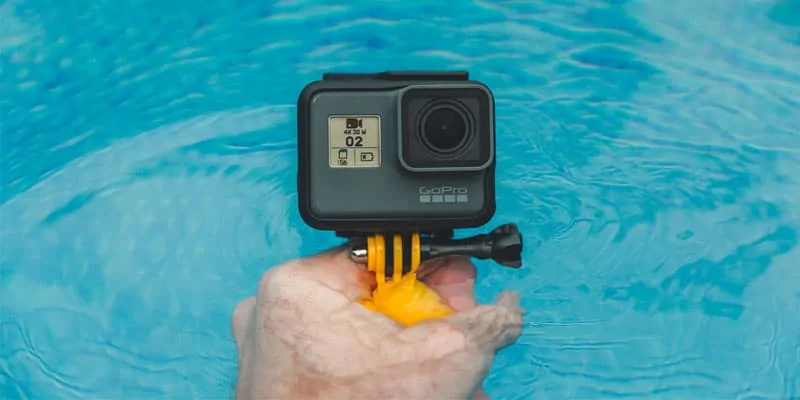
GoPro Hand Grip
This is a floating hand grip that attaches to every GoPro Hero camera. The grip makes it easier for you to capture anything you find interesting. You have more control over the angle you’re filming, which results in less movement. If you have a Hero 6 Black for example, which doesn’t come with the “HyperSmooth” functionality, this is a great way to stabilize your footage. Whenever you let go of your GoPro, it’ll float right next to you. For almost 15 bucks, this is really a game changer.

Color Correction Filter
GoPro filters allow the camera to adjust it’s color according to the water circumstances. Let’s say you snorkel in a blue sea or a green lake. This has a major impact on your pictures and videos. By using a color correcting lens, your camera is able to capture the “vibrant” underwater colors much better. This filter in particular also comes with a 16X macro lens, which is optional to use off course. Maybe not a necessary gadget for the hobby snorkeler, but if you take deep dives, this will do the trick. Don’t get one if you stay close to the surface, there’s usually no big improvement.

The Super Suit
I guess, most of you won’t really need this. Newer GoPro versions are already waterproof by themselves, however, that’s only up to 33 feet below water. Maybe, some of you plan to go even further than that. If you do, your camera will stop recording due to the pressure. So, if you want to capture videos below 33 feet, the Super Suit will help you out. In my opinion, this is meant for scuba diving. I’m just saying.

Inserts for Defogging
In case you use a housing for an older GoPro camera, or a Super Suit for a newer version, these “packages” have the downside of fogging up whenever it gets warm. Chances are, you enjoy snorkeling the most in warm water. And that’s exactly where these cases can result in moisture build-up. Anti-fog inserts can easily be placed within these cases in order to prevent any fog. I watched a whole lot of snorkeling videos on youtube, and I can often tell if someone added the inserts or not.

GoPro Mouth Mount
In case you don’t mind releasing your snorkel for a short moment, maybe this mouth mount is a cool gadget to consider. I never used one, but some people just love it. Especially when you don’t wear a snorkel and simply stay in shallow waters for some dives. Or how about walking along the beach? Or hiking towards that secret snorkel paradise? Or maybe you like to go surfing? The mount allows for an easy air flow and comes with a lanyard for safety. Probably not your first choice, I just wanted to let you know they exist.

Underwater GoPro Settings
Your GoPro will come ready to go. You just need to insert the battery and charge it using the included USB cord. You want to use a fully charged battery in order to keep it set to 100% brightness.
Make sure that you choose a memory card that is recommended specifically for your model. You should try to have at least a 64 MB card. Download the latest firmware whenever you charge your GoPro.
You can start off using the default settings on your camera. As you gain more experience, you will be able to adjust the settings to whatever is best for your snorkeling trip. Sixty frames per second is recommended for anything underwater.
Setting Your Resolution
Within your video settings you get the option to choose your resolution. Now, even though the Hero 6, 7 and 8 all allow you to capture your footage in 4K resolution, never think this is necessary. 1080p is definitely enough if you intend to share your videos on Youtube. Besides that, processing 4K videos require a faster computer, which we don’t all have access to. Filming in 4K will give you more options to zoom in whenever you edit your video, and it also allows for a better computerized stabilization.
Setting Frames Per Second
Make sure to adjust this to 60 frames per second. This allows you to capture fast moving objects, like fish for example. The Hero 6, 7 and 8 all allow you to do this. If you have the GoPro Hero 8, make sure to turn on the “HyperSmooth 2.0” functionality. Like I said, this really makes a big difference in stabilization.
Setting Your Field Of View
Make sure to set this to “Wide”. Wide will provide a natural “underwater look” and allows you to capture a broad view of your surroundings. Whenever a fish enters from the side, the wide option will make sure you capture it as soon as possible. In other words, you’ll be able to see everything just like you did when snorkeling. Not that it’s 3D unfortunately, but it comes close.
Low Light And Stabilization
In your video settings, set both low light and stabilization to “Auto”. This will enhance the brightness of your video and makes it as smooth as possible. You can’t compare it to the “HyperSmooth” option that comes with the Hero 8 Black, but at least it’s something. And it does help.
Protune
Set Protune to “On” in order to gain access to more features. Like for example the shutter or the white balance, which I usually both set to “Auto”. EV Comp I myself set to 0. The ISO depends on your visibility. If you snorkel in bright and shallow water, I would advise you to set both the minimum and maximum ISO to 100. If you decide to snorkel in deeper or darker areas, make sure to set the ISO maximum to 1600. I wouldn’t go higher than that as it could affect the brightness in a negative way.
Sharpness And Color
Sharpness I usually set to “Low” as I don’t prefer any unnecessary in-camera video processing. The quality is already great and more than enough for awesome Youtube videos. The color I set to “GoPro” as I love how they look on my computer. Also, by using this standard color, I never have to worry about changing it later on my computer. It’s usually great by itself.
Filters and Underwater Lights
Filters
The filter pack will usually come with both red and magenta filters. They help to stabilize the color, and make the colors underwater pop in your photos and videos. If the water is blue, you need to use a red filter, and for green water, use the magenta.
Be careful though. If you snorkel at the surface of the ocean, a filter will not be of any help, Instead, it will only make things worse. The deeper you go, the more it comes into effect. I’d say, if you’re close to the surface, don’t bother about filters at all.
Underwater Lights
In addition, underwater lights will really make your footage come to life. Sometimes colors are missing in deeper water because the light can’t make it all the way down. Using underwater lights will add these missing wavelengths for amazing photos an videos.
However, who snorkels with a light bulb? I’ve never seen anyone using them. Snorkeling is all about having fun, and keeping it simple. At least, for me. Sure, I’ve met a few scuba divers that took a whole bag of equipment with them. But close to the shore? No, never. I have a small snorkeling flashlight that I can attach to my mask, but I’ve only used it a few times. It’s a great alternative for anyone who doesn’t feel like carrying around “bigger gear”.
If your snorkel location is a tropical island with loads of sunshine, well, I guess bringing a light won’t be of any help. Caribbean islands like Aruba, Bonaire or Curacao are one of my favorite places to go. And there’s sunshine almost all year round. On the other hand, Silfra in Iceland is usually pretty dark. So yes, it really depends on where you are going.
This being said, how can I claim this is the giant guide for GoPro snorkeling without explaining lighting? And by the way, did you know there are a couple of great lights to actually take with you. No, they’re not too big, and yes, they’re awesome! So, if you need more light, stay tuned.
Dark and deeper snorkel locations may be a good reason to bring a light source. The best lights out there require you to get a stabilizer to mount them on. The SHOOT aluminium stabilizer could be your best choice, or at least, try to find something similar. You can attach both your GoPro and your light in order to still bring one piece of equipment. Here’s what it looks like and what to expect:

So, now we still need a light. Which one should you choose. To answer that question I did a good amount of research. My advise would be to check out the Suptig underwater lights. I found one with good reviews that’s compatible with most of the GoPro Hero cameras. You can take it with you to depths of 164 feet, not that a snorkeler needs that, and the 84 LED lights are dimmable. If you’re curious, click the image below to check it’s latest price (usually around 37 dollars).

Tip: If you’re a gadget freak, feel free to also visit our snorkel gifts article.
Improving Your Photo And Video Skills
Pre-Production
Let’s say you already made a couple of videos, and you’re a bit “meh” about them, is there anything you can improve? Obviously, the first thing to remember, is to record cool footage. But how do we do that? Here are a few awesome tips I use myself.
Never Film Downward
Whenever you make an underwater movie, make sure to never face your camera towards the bottom of the ocean. Sure, from time to time this can work, but from my experience I rarely find them amusing enough. Often, it’s dark down there, which isn’t fun to watch.
So, make sure you position your GoPro horizontally, or sometimes even upward. Shoot up to the reefs, the fish, the corals, it can be anything. A view from the side is much cooler than from above, in most cases.
Find An Interesting Background
Ok, so you found this lovely turtle, and you want to capture how it moves through the water. Awesome! I love to do that myself, especially since most of them are used to humans. Even though it’s always necessary to keep a 10 feet distance, following a turtle is spectacular.
But what about the background? Would a video be interesting if the background fades away into the dark, or is it cooler to have a reef for example? Think about this for a second. Filming a turtle from the side, with colorful corals in its background, is way cooler to watch than having no background at all. Compare it with a movie. There’s usually always a background, right?
Switch Your Perspective
If you want to make an interesting video, make sure to mix up all kinds of things. One thing is to add some special elements. Let’s say you followed that turtle for a while, and you have it all on video. Sure, it’s fun to watch, but if it’s 5 minutes long that could be boring for your viewers.
Therefore, let’s mix! One thing I like to do, is to position my camera on the ocean floor. I find a spot where it doesn’t move, or sometimes I even bring a tripod. I have my camera face the ocean surface, and I simply snorkel above it. The same works sideways off course. Since the video doesn’t move at all, it’s just as if the ocean has cameras of its own. I hope you know what I mean.
Dominate Selfiesticks
Yes, I love them myself a whole lot, but the long arm makes it almost impossible to shoot stabilized videos. Therefore, either stay as calm as possible, or simply avoid them. For pictures, sure, they are perfect. For videos however, maybe not so much.
Add Human Elements
Make your video personal is what I mean by that. Besides swimming over your own camera, try to think of more entertaining scenes. I once made a video in which I brought my daughter’s toy mermaid. I positioned it next to a big rock, I swam back to another location, and after that I returned to the stone as if it’s always been there. I even made my daughter act (later on) about how upset she was to lose her mermaid. My wife filmed me coming from the water showing her I found it.
Sure, that’s all fake, and you don’t need to be fake if you don’t want to. In my case, everybody knows I always make these kind of silly jokes. But hey, it’s me. And that’s a great way to keep people entertained. They saw the turtle, but they also saw me. Never forget about being yourself.
Preparation and Bloopers
Who knows, maybe you’re boarding a snorkel boat trip, or maybe you’re lying on the beach next to a Hawaiian monk seal. Maybe you’re trying to snorkel with your glasses on for the first time, or who knows you’re about to snorkel whilst you’re pregnant. Before any snorkel adventure, there’s always something to film. Think of it this way: You want to make a mini-movie. Find an introduction, a plot, and an end.
Entering a boat before snorkeling is fun. Not to mention all the scenery you may experience. Film that too. Film yourself and your friends. And when you head back, maybe you’re having a barbecue or a little party. That’s all part of the experience, and it really makes the whole movie thrilling.
In case something funny happens, you can even add a bloopers moment at the end. Maybe you took your underwater metal detector with you, and you thought you finally found that pirate treasure, but it turns out to be an old can. These things can make people laugh.
Production
I don’t know about you, but I usually find a lot of joy whenever I get to edit my videos. I’m always happy to find a few lovely scenes, and it feels as if I’m still there. So, here are my production tips.
Make It Cinematic
Whether or not you set your field of view to “wide”, which I usually do, there’s a way to make it look even wider. However, it all depends on the program that you’re using. I personally use iMovie, but almost any program allows you to do a whole bunch of things.
Google how to add “widescreen bars” to the top and the bottom of your video. Not that you have to, but it definitely adds to the “wow factor”. Cropping your videos can do about the same thing as well, so play around with that option if you like. These days, it’s all about wide screens. And with just one easy trick, you can do the exact same thing.
Use Slowmotion
Many programs allow you to use some kind of slowmotion feature. In iMovie it’s the little “turtle button”, but your software may be different. Anyways, back to the turtle you’re filming. Let’s say you followed him around for quite a while, and he suddenly moves his head towards you. Why not play that in slowmotion. Add some different perspective effects and now you have a video full of surprises. I use this feature quite often, usually when we jump off a boat or walk out of the water. But you can do it anytime you like. Like I said, mix things up.
Stabilization
Some programs have an additional stabilization feature. If your video is shaking a lot, even though you selected the stabilization mode, you may want to give your computer a try. Usually, a portion of the background will disappear, but it’s definitely worth a try.
Color Correction
I usually never experiment with this. Like I mentioned earlier, I’m pretty happy with the standard GoPro color settings. However, it may be fun to adjust colors from time to time. I once used a theme that came with some kind of “Laurel and Hardy” atmosphere, so I changed the intro to black and white. If you miss some bright colors in your videos, playing around with them can make things a whole lot brighter.
Add Music And Sound Effects
Please don’t think you need to turn this into a music video. It’s definitely not that. Underwater audio is often limited, unless you hear these cute bubbles going everywhere. So why not add a little bit of music. There are a lot of websites that allow you to use their music, royalty free, like Bensound for example. You just need to make sure you refer to their website (and the specific song) in your video description.
Sound effects are fun as well. Even a few simple bubbles or some ocean sounds will do the trick. Do a little research and you’ll be fine. I know, editing can take a whole lot of time, but a few sound effects can really spice things up. Usually it’s not that time consuming either.
Pro Tips From My Own Experience
I Usually Leave My GoPro On
It may sound strange, but I always aim to have my GoPro on whenever I go snorkeling. I know, it takes energy, but whenever I go on an adventure I try to capture whatever I can. I don’t take it with me at all times. But whenever I do, it’s usually always running. Sometimes, when I don’t bring my camera, I regret it whenever I find something interesting. However, I can always go back and record the scenery. Off course, interesting marine life may have disappeared.
I Have A Back-Up Battery
Since I leave my camera on most of the time, it’s always good to have one spare. Especially when I stay close to the shore. It’s not that big of a deal for me. Whenever something spectacular happens, like a monk seal whilst snorkeling in Kauai, it can be a delight. I think memory cards are pretty good these days, but bringing a spare one may be something to consider as well.
For Selfies, Use The Burst Mode
Besides filming, I love to take a few good pictures. Ocean water can be quite unpredictable, so why not make sure you get to choose the best picture once you’re back home? Out of the 30 pictures I take, at least one of them has to be cool, funny, or extremely pretty. That’s how I manage to look good in pictures by the way.
Get The GoPro Hand Grip
I listed a whole lot of gear in this article, and I tried a few, however the GoPro hand grip is definitely my favorite. I use it most of the time. You get used to it very fast, and it’s so convenient. You kind of “feel” where your camera is headed, and it’s great for stabilization. If you don’t have the money for a GoPro Hero 8, I’d prefer to have a Hero 6 with the hand grip instead of a Hero 7 without it. I’m serious.
Film Your Friends And Family
Capturing the marine life is fun, indeed, but never forget about filming your friends and family. Sometimes, they are the ones that seem to be the fish in the water. In the end, once we’re older, what’s more important: A colorful triggerfish or your own child snorkeling for the first time? Keep that in mind.
Tip: If you’re snorkeling with kids, make sure to read my “Giant Guide For Snorkeling With Kids” as well. It’s packed with a whole lot of information!
Final Thoughts
In my honest opinion, the GoPro cameras are able to provide some awesome footage for your snorkel trip. There are a whole lot of accessories to choose from, each offering some entertainment, but owning just the camera is already fun enough. If you ask me about my most favorite add-on, it’s the hand grip.
You can buy all of the gear that’s out here, you can even bring an underwater light, but you can’t change the weather. If you pick a sunny and calm day, you’re probably just fine with only the camera. Besides, would you go snorkeling on a cloudy or windy day anyways? I usually skip those days and find something else to do, even though snorkeling in the rain can be awesome!
If you experience motion sickness easily, try not to focus on one spot too long. Read more in our guide called “Can snorkeling make you seasick?“.
Be cautious with ordering too much gear. If you plan to take it all with you, ask yourself if that’s actually possible. Or if you only bring carry-on luggage, make sure to learn more about bringing snorkel gear on a plane.
If you like to edit your videos, and combine them in some kind of compilation, make sure to always keep that in mind. Whenever you film, think about the end result. Anything crazy can be added to the bloopers, but the GoPro is not a human machine that knows where to aim for. It’s up to you to do that properly. If you keep the end result in mind, you’re probably going to be just fine. Watch a few videos online, and learn from those.
Looking back at pictures and videos once back home is big fun. I would advise it to everyone. Editing is not that hard to learn, and if you have a Mac, iMovie should be already on there. So you don’t need to pay for an expensive program. Sharing your videos with friends is fun too. Maybe you went snorkeling in Maui, and your friends were thinking to do the same thing. Well, show them how cool it was. Maybe another friend is scared to snorkel, well, share your own experience. It could be of great help. Whatever the reason, sharing is caring!
Update: In the meantime we wrote a review about snorkel scooters. Some of them come with a GoPro attachment as well. Feel free to take a look if it sounds interesting.
